
P365 Optic Mounting Guide
Posted by Lee on Jul 23rd 2025
Hi y’all, Lee here. I want to take some time to help guide you on some of the optic cut options we offer for the P365 slides as well as what hardware you need to use to directly mount the optic. There are a lot of optic cuts out there with minor variations so this may not necessarily apply to every slide out there. We’ve designed our optic cuts with specific requirements as well as some minor tweaks to get the most out of the design. I’ll walk you through the mounting requirements and hardware recommendations for most of the popular optics the slides are compatible for.
TL;DR: Our RMSc shield cut slides use an M4 threaded hole and must use the hardware provided by the optic manufacturer. The screw length should be between 8mm and 10mm, depending on the optic deck height. For the Trijicon RMRcc cut, only the RMRcc optic is compatible with that cut, and you must use the sealing plate and screws Trijicon includes with the optic. Always follow the optic manufacturer’s manual for installation instructions and torque specifications. Use the chart at the end of the blog for quick reference.
Overview:
The P365 pistol has gone through multiple updates since its launch. You’ll see versions with iron sights integrated in the rear optic cover plate and some without optic cuts. For those optics ready versions, SIG’s optic cut uses an M3 threaded hole surrounded by a raised post feature, without any other locating posts around the corners like the traditional RMSc shield cut. If you’ve tried to switch to one of our slides using the same optic and hardware, you were probably not able to tighten down the optic like on the factory slide. This is because the RMSc shield cut is normally specified with an M4 thread. This blog will cover some of those pitfalls and what you’ll need to mount specific optics to our P365 slides.
Norsso P365 slides:
Our P365 slides were some of the first ones on the market that were made from solid material as well as offering an optic cut with back up iron sight capability. This gave us the freedom to be able to design our optic cuts and iron sight options independently from a factory milled slide. All our P365 slide variants, minus the P365-FUSE, will have the same optic cut options and be applicable for the next part of the blog. We offer two main optic cut options for the slides we stock; the RMSc Shield/Holosun 507K cut or the Trijicon RMRcc cut. Both are designed to accommodate direct mounting for compatible optics with the manufacturer’s provided hardware. For the most common optics, we’ll be able to provide hardware guidance and recommendations but it would be wise to dive deeper into the hardware provided and the reasons on the lack of continuity between options.
Optic hardware variation:
With the current design direction of optics, most manufacturers must make concessions in design to fit all the features into a small footprint. Add the constraints of a specific mounting pattern to make integrating more attractive, it is no surprise that companies must start looking for custom hardware to finalize the system. Most of these micro optics are making custom head sizes, profiles, and other design changes to get their optic mounted securely and safely. Here’s a few examples of four different head profiles for four different optics, all 4mm screws, with all optics designed for the RMSc shield footprint.
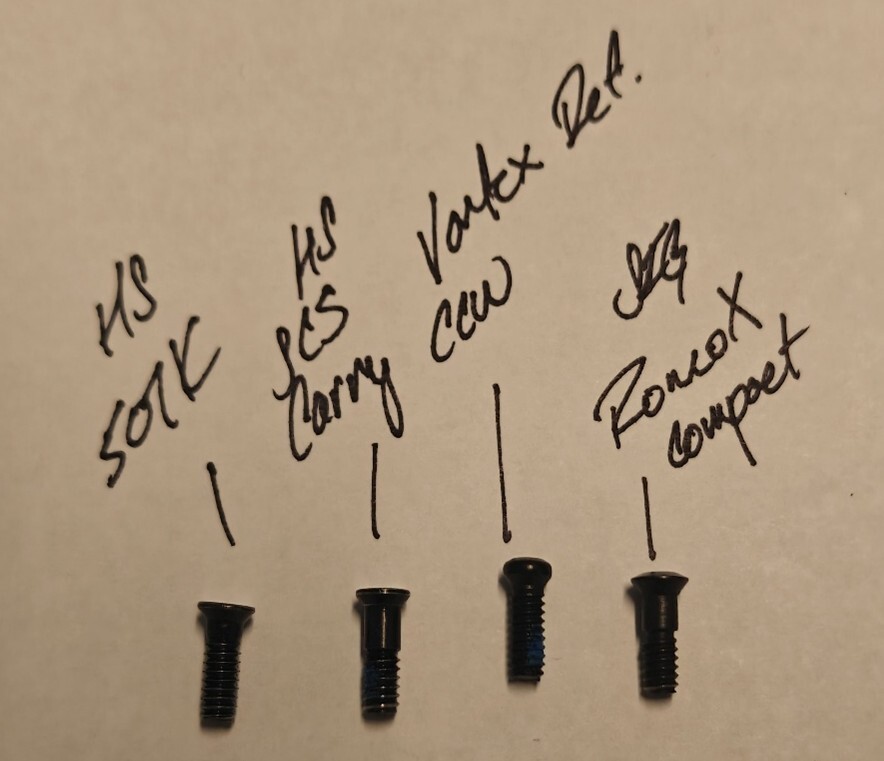
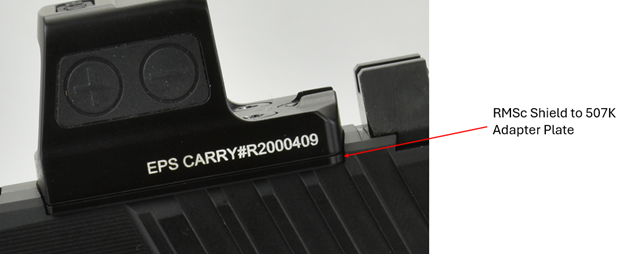
Even between Holosun models, you’ll have minor variations to meet each optic’s design requirements. The screw from the 507K doesn’t seat fully into the counterbore of the SCS Carry optic. The SCS carry screw’s head is smaller in diameter.

Why does this matter? Well, torquing that down onto the SCS carry might cause some body damage and might void your warranty if the right screws were not used. Another point is that it may lower the thread count that is installed into the slide, causing a shallow bite and lowering your holding force. Mixing hardware from different manufactures might not fit at all so keep your hardware sets organized and assigned. I’ve had many calls claiming that our optic cut doesn’t work, all to find out that they mixed up the screws from another optic or thought that any screw can be used just because the optic cut is the same.
Optic hardware selection:
Now that you know how important the proper hardware is, let’s get into which ones you’ll need to mount to our slides. Our P365 slides with the Trijicon RMRcc cut are straightforward since there’s only one optic that works on that optic cut. When this was published, there wasn’t another manufacturer that I knew adopted the Trijicon RMRcc pattern for their optic. If you choose the RMRcc cut, you’ll be stuck with that optic so be sure that you want to run that before building your slide. If you’re still unsure of what optic you want to run, I’d recommend the RMSc shield footprint as that gets you over a dozen optic choices from various manufacturers. That way you can find the one that meets your tactical needs. If you’re not sold on the Trijicon RMRcc, then you’ll want to read the next section to learn about the RMSc shield cut we offer.
Norsso’s RMSc shield/Holosun 507K Cut Anatomy:
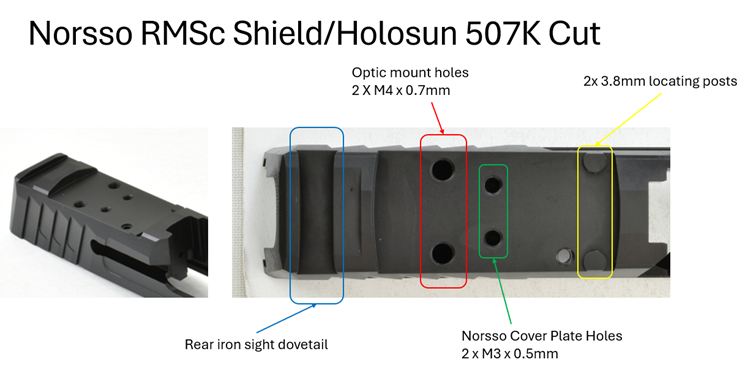
We’ve made our RMSc shield cut like the 507K cut, which only uses the two front posts (yellow) as well as using the larger diameter, M4 screw (Red) to mount instead of the M3 thread version. We’ve opted to use to the M4 screw to increase the screw shear strength as well as to reduce the chance of cross threading. There are two separate M3 holes (Green) for use with our exclusive optic cover plate (only for some models). Those holes are centered further on the slide to prevent the screw heads from protruding out the sides, reducing snag points and providing a cleaner look. Incorporated behind the optic is the rear iron sight dovetail feature. The location pushes it all the way to the rear to get the maximum sight radius with your front and the most options as far as sight depth (with respect to firing axis). There’s limited space for the optic and iron sights to share depth wise, so we do recommend an “optics ready” or “optics compatible” style rear iron sight as they are more compact and don’t have long sight overhangs in either direction. All these features compose our optic mounting solution for our P365 slides. Note that the P365-FUSE slide will have a different footprint than this, even if the optic compatibility and name is the same.
There are three aspects of our design choices that should be observed:
- We use an M4 x 0.7 threaded hole, not M3 x 0.5 like on the factory slide (excluding FUSE)
- We keep the two front locating posts and remove the two rear ones
- Depth of cut was designed to get lower 1/3rd with available iron sight options, not as low as factory optic cut.
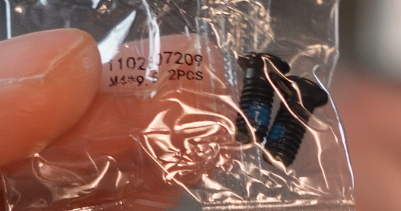
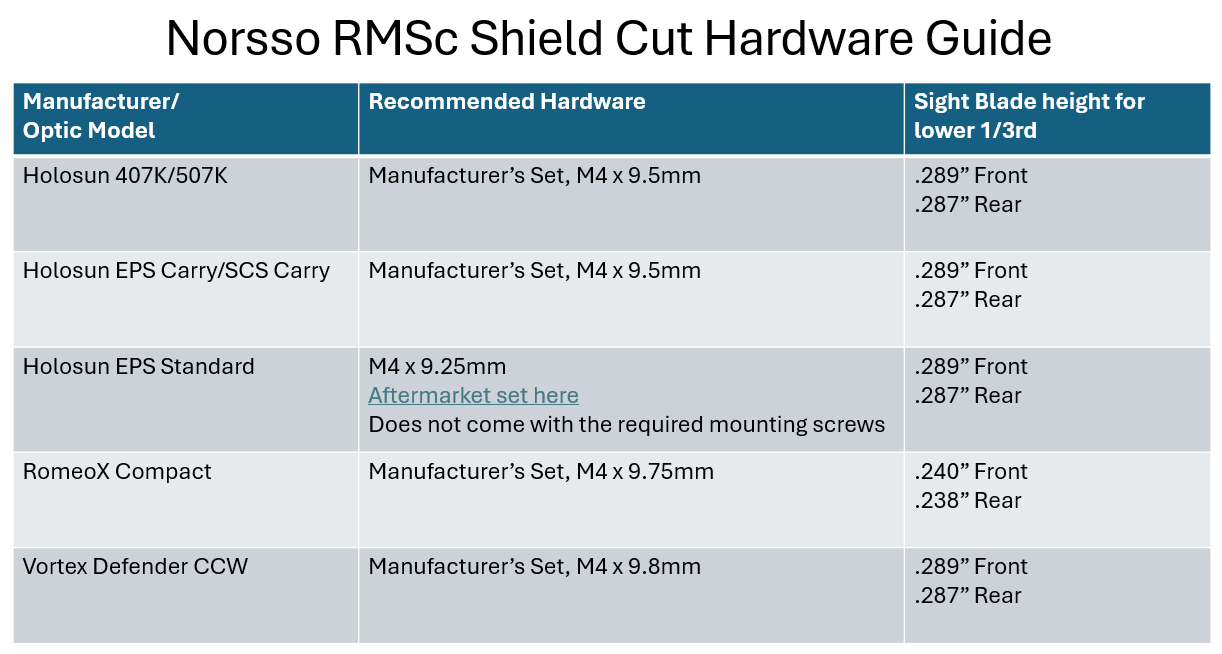
The first aspect impacts those migrating from a stock P365 with an optic installed. You won’t be able to use the screws from the factory firearm as they run M3 screws. For the Holosun optics, you’ll need to go back into your original optic box and find the M4 set. Your revision might have a different length than what’s shown below but if the screw you have is between 8-10mm in overall length then you will be good to go.
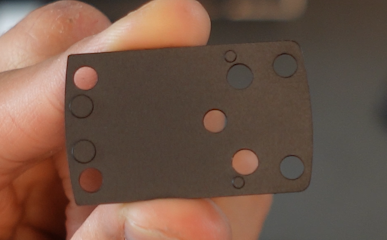
The second aspect allows you to avoid using the Holosun adapter plate they include to convert from the full RMSc shield footprint that has all 4 locating posts. That way you’re not forced to push the optic up higher by using the plate shown below.
The third aspect will impact your iron sight choices if you want to use them as Back Up Iron Sights. Especially for defense purposes, back up iron sights are there to give you another point of aim if your optic becomes inoperable. We designed the optic cut to get a lower 1/3rd with suppressor height sights, as that height provided the most options as well as being tall enough to clear the deck height of the optic. Nowadays, manufacturers are coming out with more intermediate heights for all the variation in optics, mounting methods, and pistol models. We have three different iron sight height options recommended based on each optic having their own unique deck height. Below is a quick chart that shows the hardware and sights you’ll need for this setup based on the optic choice. If you don’t have the exact length of screw that came with your optic, you’ll be okay as long as they’re around 8-10mm in length. I’ve seen some revisions with lengths up to 12mm to where the screw will bottom out before securing the optic so hopefully that doesn’t happen to you.
That’s pretty much everything about the P365 optic cut options we have to offer. Some of our slides come with a non-optic cut version for those that want to run just iron sights. Our shop also can machine sight dovetail locations in front or behind the optic, as well as remove them entirely for race cuts. I plan on making those custom configurations more streamlined on the website but email us at info@norsso.com if you want to get a setup like that started ASAP. As always, I hope this blog gives you some more insight on your next build and thanks for reading!
Thanks,
Lee